
Losing files on a Mac is rarely convenient, but the impact can be very different depending on what disappeared.
Sometimes it is a document deleted a few minutes ago. Sometimes it is a folder of RAW photos, an editing project, a client video, or footage that was copied from a camera but never backed up properly. And in the worst cases, the MacBook itself stops booting before you have a chance to rescue anything.
For photographers, filmmakers, designers, YouTubers, and other creators, a Mac is often more than a personal computer. It may be the center of an entire production workflow, connected to external SSDs, SD cards, cameras, GoPros, drones, audio recorders, and other storage devices.
That is why Mac data recovery should not begin with randomly trying repair commands. It should begin by understanding where the files were stored, how they were lost, and how much activity has happened since then.
If you are comparing the best Mac data recovery software, first identify the situation you are dealing with: a recently deleted file, an emptied Trash folder, a formatted external drive, a failed SSD, or a MacBook that can no longer start normally.
First, Stop Writing New Data to the Drive
The most useful thing you can do after discovering missing files is often the simplest: stop using the affected storage.
If the files were deleted from an external SSD, USB drive, or memory card, disconnect it once you have confirmed the loss. If the missing data was stored on the Mac's internal drive, minimize activity as much as possible.
Avoid downloading large files, exporting videos, installing applications, synchronizing big cloud folders, or moving hundreds of gigabytes of media around.
Why?
When a file is deleted, the storage space it occupied may eventually be reused for new data. The more you continue working on the same drive, the more opportunities there are for that old data to be overwritten.
Check the Obvious Places Before Starting a Full Recovery
Not every missing file has actually been deleted.
Before scanning a drive, check the places where files are commonly moved, synced, or hidden.
Start with Trash. Then use Spotlight to search by filename, extension, project name, or a phrase that may appear inside the document.
Also check:
Desktop
Documents
Downloads
iCloud Drive
Recent folders
Shared folders
Cloud storage history
Email attachments
App-specific libraries
Backup drives
Creative workflows deserve a few extra checks.
If you are working with photos or video, look at your external SSDs, editing libraries, import folders, proxy folders, cache locations, SD cards, and camera storage. A project may appear to have disappeared when the source media was actually moved or disconnected.
If the files still cannot be found, that is when recovery software becomes worth considering.
Deleted Files on Mac Are Not All the Same
"Recover a deleted file" sounds like one problem, but Mac data loss can happen in several different ways.
You might have:
Deleted a file and emptied Trash
Formatted an external SSD
Erased an SD card after importing footage
Lost files during a failed transfer
Disconnected storage while data was being written
Had a file system become unreadable
Lost access to a disk after a macOS crash
Removed a project folder by mistake
Lost files after partition or disk changes
Found that a MacBook no longer boots at all
Each case calls for a slightly different approach.
A recently deleted document on an otherwise healthy Mac is very different from a MacBook that is stuck at startup. Likewise, a formatted external SSD containing a video project has different recovery priorities from a single deleted PDF.
The better the recovery tool understands both the storage device and the file types involved, the more useful the recovery process becomes.
Where Wondershare Recoverit Fits
Wondershare Recoverit is designed for situations where Trash, Spotlight, cloud history, or existing backups are not enough.
Its Mac recovery tools cover a range of storage devices commonly used with Macs, including internal Mac storage, external HDDs and SSDs, USB drives, memory cards, SD cards, and camera storage.
It is also designed to work across common file systems found in Mac and cross-platform storage environments, including APFS, HFS, HFS+, ExFAT, FAT, NTFS, and RAW disks.
That broad device support matters because modern Mac workflows rarely stay entirely inside the Mac.
Recoverit approaches recovery around the relationship between the device, the storage medium, the file format, and the way the data was lost.
That is particularly relevant for photo and video recovery, where the files involved may be large, fragmented, or created by professional and creator-focused hardware.
Recoverit V15 Puts More Focus on Mac and Creator Workflows
Recoverit V15 is expected to place a stronger emphasis on creators, and Mac recovery is one of the areas receiving particular attention.
That direction makes sense because many creative professionals build their workflows around MacBook Pro, Mac Studio, iMac, and external high-speed storage.
For these users, recovery is rarely limited to "I accidentally deleted a file."
A more realistic creator workflow might look like this:
Camera or drone → SD card → Mac → external SSD → editing software → backup drive
A problem can happen at almost any step.
The SD card may be formatted before the files are copied. Recoverit V15's stronger Mac focus is intended to improve performance in these types of workflows, with more attention on recovery involving Macs, professional devices, removable storage, and valuable photo and video files.
In other words, the positioning goes beyond general file recovery.
It is closer to:
Creators × Macs and professional devices × SD cards and external storage × high-value photo and video recovery.
That makes the Mac version particularly relevant for photographers, videographers, content creators, drone users, and others who routinely move large media files between multiple devices.
Recovering Files From the Storage Devices Connected to a Mac
One advantage of looking at Mac recovery as a complete workflow is that the lost file may not actually be on the Mac itself.
It could be on:
An SD card from a mirrorless camera
A microSD card from a GoPro
A drone memory card
A USB flash drive
A portable SSD
An external hard drive
Another removable storage device
How to Use Recoverit for Mac Data Recovery
Identify the Original Location
Before scanning, determine where the files last existed.
Was it:
The Mac's internal storage?
Desktop?
Trash?
An external SSD?
A camera SD card?
A USB drive?
A memory card?
Another connected disk?
Scanning the correct location from the beginning saves time and makes the results easier to manage.
Select the Location in Recoverit
Open Recoverit and choose the affected drive or storage location.
If you are recovering from removable storage, connect the device securely before starting.
For external drives, use a reliable cable and avoid unstable USB hubs where possible.
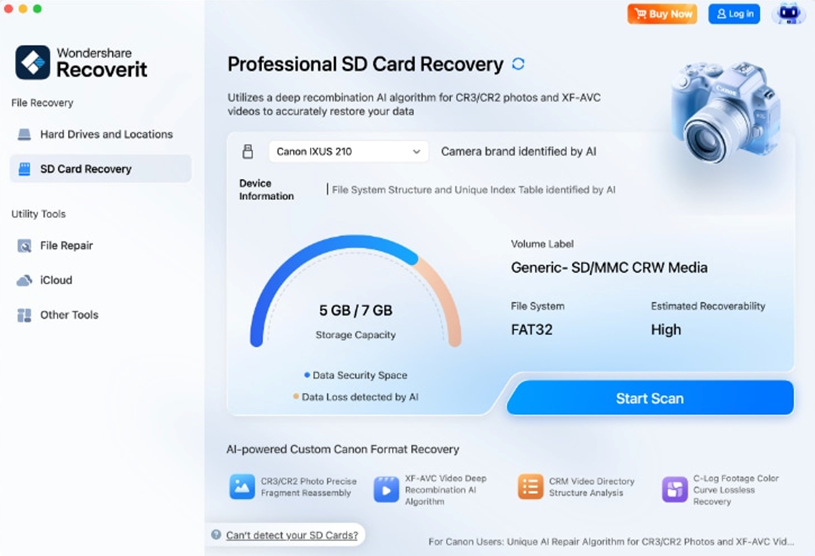
Start Scanning
Begin the scan and allow Recoverit to inspect the selected storage.
The amount of time required will depend on the drive size, amount of data, condition of the file system, and file types involved.
Large creative drives may naturally take longer because they can contain hundreds of gigabytes or even terabytes of video, photos, audio, cache files, and project assets.
Avoid interrupting the scan unnecessarily.
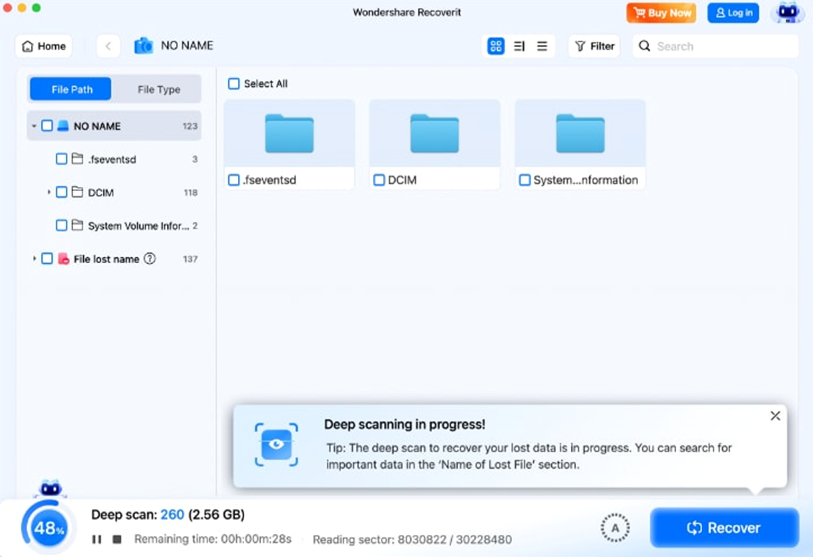
Filter the Results
A full scan can return many files, so filtering is important.
You can narrow results using information such as file type, filename, size, date, or location.
For everyday recovery, you may be searching for:
Documents
PDFs
Spreadsheets
Presentations
Archives
Notes
For creative work, you may instead be looking for:
JPEG images
RAW photos
PNG files
MOV video
MP4 video
Audio files
Large project folders
Camera media
Good filtering becomes especially valuable when recovering from a drive that has been used for years.
Preview Files Before Recovering Them
When preview is available, use it to confirm that you have located the correct file. This can save considerable time when several files have similar names.
It is particularly helpful for photos and videos, where names such as IMG_2847, DSC_1082, or DJI_0471 may not tell you which file you actually need.
Recover Files to a Different Storage Device
Do not restore files back to the same drive being recovered.
If you are recovering from the Mac's internal storage, save the results to an external SSD or another safe disk. If you are recovering from an SD card, save the files to the Mac or a different external drive.
Verify the Recovery
After the files have been saved, check them before making changes to the original storage.
For valuable creative work, consider making a second backup before reformatting, repairing, or reusing the original drive.
Final Thoughts
The best Mac data recovery workflow in 2026 is not simply a matter of choosing software and clicking Scan.
Start by understanding where the data was lost. Protect that storage from new writes. Check Trash, cloud storage, backups, and connected drives. Then use recovery software when those simpler options do not solve the problem.
For a MacBook that will not boot, the same principle becomes even more important: protect the data before making major system changes.
Wondershare Recoverit fits particularly well into this broader Mac recovery picture because it is designed around more than just deleted documents. Its focus includes different storage devices, file systems, loss scenarios, and increasingly, the photo and video workflows used by creators.
With Recoverit V15 putting more emphasis on Mac performance, creator devices, removable storage, and high-value media recovery, the product is moving closer to the way many Mac users actually work today.